Add the Sintra Crochet Square pattern to your favorites on Ravelry

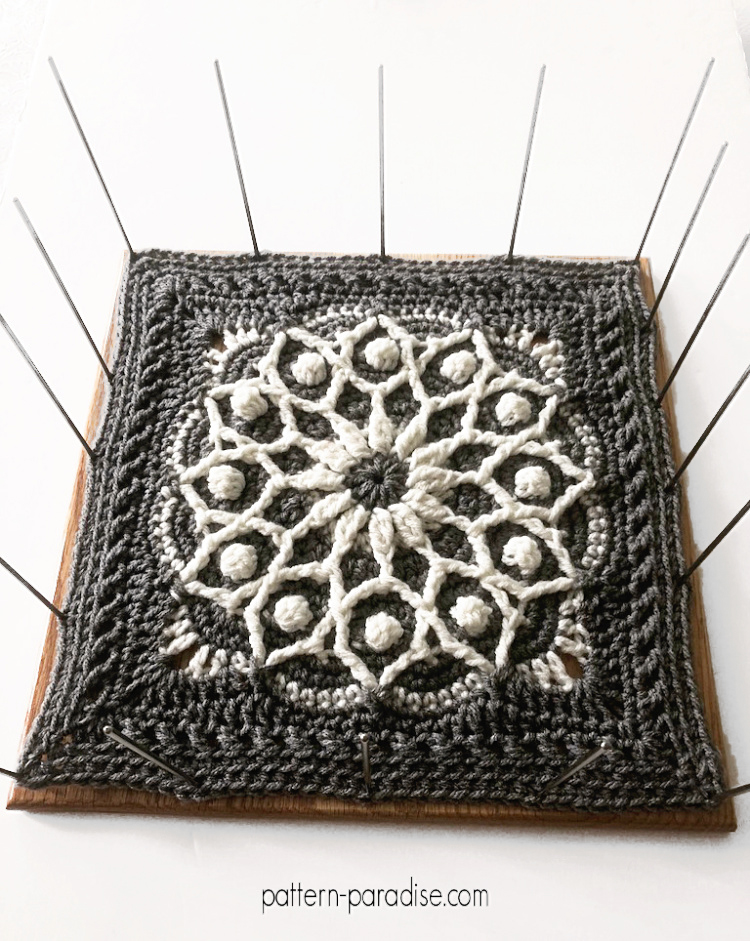
Sintra Crochet Square
Scroll down for the free pattern
~or~
Purchase an ad-free PDF version on Ravelry
And don’t forget to Pin It Too
Find all my FREE crochet patterns HERE
The Sintra Square uses the embossed crochet technique where front and back post stitches combined to create a raised pattern. It’s a pretty square that has a different look depending upon the number of colors used and the order in which they are used. In a solid color, it’s all about the texture, in two coordinating colors, the raised stitches pop for an “embossed” look!


I designed the Sintra Crochet Squares in Red Heart With Love yarn but you can choose from almost any yarn, just be sure to adjust the hook for the weight you are using and remember the finished size will differ too.

As with all of my crochet squares, the Sintra Crochet Square can be used in lots of different projects — join two for a pretty throw pillow, create sides and base and join two for a tote bag, you could even fashion these into a garment with a little creativity!
The Sintra Square is a nice coordinating square to my Barcelona, Casablanca and Monty Carlo Squares too.


I used the Chetnanigans BlocksAll Board to block my squares and I love this tool! You can read my review HERE!
*****
Sintra Crochet Square Instructions
Size: 12” Square
Materials:
- Made with worsted weight yarn, I used Red Heart With Love in Iced Aqua and Peacock for my samples. Approximately 90 yards of each color
- Hook Clover Amour J/6.00 mm
- Tapestry needle for weaving ends
Did you know I have a shop on Amazon featuring some of my favorite tools and gadgets? Click the link below to visit my shop and get great products, at great prices, fast and easy.
Gauge: Check diameter measurements as noted in pattern.
Abbreviations (US Terms):
BLO: Back loop only
BPdc: back post double crochet
ch: chain
dc: double crochet
FPdc: front post double crochet
hdc: half double crochet
sc: single crochet
sl st: slip stitch
st(s): stitch(es)
YO: yarn over
Special Stitches:
CL (Cluster): *YO, insert hook around the designated st, YO and pull loop through* (3 loops on hook), repeat between * 3 times (9 loops on hook), YO and pull through all loops at once.
Notes:
- Pattern is written in US Standard terms
- The stitch count is in ( ) at the end of each round.
- Repeat instructions within * or # as indicated.
- When a number precedes a stitch, work that number of stitches in the next stitch, example 3dc means work 3 double crochets in the next stitch.
- When a number follows a stitch, work that stitch in the designated number of stitches, example dc 3 means work a dc in each of the next 3 stitches.
- Work all post stitches around the post of the next stitch (not in the top of the stitch).
- This pattern technique is called Embossed Crochet, which allows some stitches to be raised or “pop up” while others recede, giving the design the 3D effect.
Starting a Round:
- The ch1 or ch2 at the beginning of a round DOES NOT count as a stitch.
- Join rounds with slip stitch to first stitch of round.
- The beginning ch5 counts as a dc + ch2.
Color Changes:
- I wrote this pattern to be worked in 1 or 2 colors, but of course, you may use as many or as few colors as you like.
- 1 Color Version: All rounds are worked in the same color.
- 2 Color Version: The first two rounds, ALL FPdc and stitches worked into ch1 spaces are worked in Color 1; all other stitches are worked in Color 2. Use the same color until the noted color changes.
- For ease of reading, I have highlighted the Color 1 stitches in red.
- In this pattern, color changes are made in the last pull-through of the stitch before the new color starts. Work stitches as usual until you have 2 loops on your hook, in the last stitch before the color change. Wrap the new color around the end of the hook, then pull it through and finish the stitch with the new color.
- I use the Fair Isle technique to carry the unused color in the back of the work and tack it in place with the color in use as I work into the chain 2 spaces at the corners or into the ch1 spaces of the raised “leaf“. Be sure not to pull too tight on the yarn not in use or the square will pucker.
Sintra Crochet Square Instructions:
Round 1: With Color 1, make a Magic Circle (or ch4 and join with a sl st to form a circle), ch1, work 12hdc in center of circle, join. Pull beginning tail tightly to close center hole, secure in place. (12)
Round 2: Ch2, *CL around next hdc, ch 2, CL around next hdc, 3dc in next hdc*; repeat between * to end, join to top of first CL, then sl st into corner ch2 space. (8 CL + 12 dc + 4 corner ch2 spaces)
For 2 color version, pay attention to color changes! Work Rounds 1 and 2, ALL FPdc and stitches worked into ch1 space in Color 1; all other stitches are worked in Color 2.
Round 3: Join Color 2, Ch5, dc in same ch2 space, * skip CL, BPdc 1, [FPdc, ch1, FPdc] around next dc, BPdc 1, skip CL, [dc, ch2, dc] into corner ch2 space *, repeat between * to end, join to 3rd ch of beginning ch5, sl st into corner ch2 space. (24 dc + 4 ch 1 spaces + 4 ch2 corners)
Round 4: Ch5, dc in same ch2 space, *# BPdc 2, FPdc 1, [dc, ch1, dc] into ch1 space, FPdc 1, BPdc 2 #, [dc, ch2, dc] into corner ch2 space*; repeat between * twice; repeat between # once, join to 3rd ch of beginning ch5, sl st into corner ch2 space. (40 dc + 4 ch 1 spaces + 4 ch2 corners) Gauge Check: 3.5” Diameter
Round 5: Ch5, dc in same ch2 space, *# BPdc 1, FPdc 1, BPdc 1, FPdc 2, [dc, ch1, dc] into ch1 space, FPdc 2, BPdc 1, FPdc 1, BPdc 1 #, [dc, ch2, dc] into corner ch2 space*; repeat between * twice; repeat between # once, join to 3rd ch of beginning ch5, sl st into corner ch2 space. (56 dc + 4 ch 1 spaces + 4 ch2 corners)
Round 6: Ch5, dc in same ch2 space, *# BPdc 2, FPdc 1, BPdc 1, FPdc 3, 2dc into ch1 space, FPdc 3, BPdc 1, FPdc 1, BPdc 2 #, [dc, ch2, dc] into corner ch2 space*; repeat between * twice; repeat between # once, join to 3rd ch of beginning ch5, sl st into corner ch2 space. (72 dc + 4 ch2 corners) Gauge Check: 4.5” Diameter
Round 7: Ch5, dc in same ch2 space, *# [FPdc, ch1, FPdc] around next st, BPdc 2, FPdc 1, BPdc 1, FPdc2tog, FPdc 4, FPdc2tog, BPdc 1, FPdc 1, BPdc 2, [FPdc, ch1, FPdc] around next st #, [dc, ch2, dc] into corner ch2 space*; repeat between * twice; repeat between # once, join to 3rd ch of beginning ch5, sl st into corner ch2 space. (80 dc + 8 ch 1 spaces + 4 ch2 corners)

Round 8: Ch5, dc in same ch2 space, *# BPdc 1, FPdc 1, [dc, ch1, dc] into ch1 space, FPdc 1, BPdc 2, FPdc 1, BPdc 1, FPdc2tog, FPdc 2, FPdc2tog, BPdc 1, FPdc 1, BPdc 2, FPdc 1, [dc, ch1, dc] into ch1 space, FPdc 1, BPdc 1 #, [dc, ch2, dc] into corner ch2 space*; repeat between * twice; repeat between # once, join to 3rd ch of beginning ch5, sl st into corner ch2 space. (96 dc + 4 ch 1 spaces + 4 ch 1 spaces + 4 ch2 corners)
Gauge Check: 7.5” Diameter

Round 9: Ch5, dc in same ch2 space, *# BPdc 2, FPdc 2, 2dc into ch1 space, FPdc 2, BPdc 2, FPdc 1, BPdc 1, FPdc2tog two times, BPdc 1, FPdc 1, BPdc 2, FPdc 2, 2dc into ch1 space, FPdc 2, BPdc 2 #, [dc, ch2, dc] into corner ch2 space*; repeat between * twice; repeat between # once, join to 3rd ch of beginning ch5, sl st into corner ch2 space. (112 dc + 4 ch2 corners)
Gauge Check: 8” Diameter

Round 10: Ch5, dc in same ch2 space, *# BPdc 2, 2BPdc around next st, FPdc2tog, FPdc 2, FPdc2tog, 2BPdc around next st, BPdc 1, FPdc 1, BPdc 1, FPdc2tog, BPdc 1, FPdc 1, BPdc 1, 2BPdc around next st, FPdc2tog, FPdc 2, FPdc2tog, 2BPdc around next st, BPdc 2 #, [dc, ch2, dc] into corner ch2 space*; repeat between * twice; repeat between # once, join to 3rd ch of beginning ch5, sl st into corner ch2 space. (116 dc + 4 ch2 corners)
Gauge Check: 9” Diameter

Round 11: Ch5, dc in same ch2 space, *# [FPdc, ch1, FPdc] around next st, BPdc 3, 2BPdc around next st, FPdc2tog two times, 2BPdc around next st, BPdc 2, FPdc 1, skip next st, FPdc 1, skip next st, FPdc 1, BPdc 2, 2BPdc around next st, FPdc2tog two times, 2BPdc around next st, BPdc 3, [FPdc, ch1, FPdc] around next st #, [dc, ch2, dc] into corner ch2 space*; repeat between * twice; repeat between # once, join to 3rd ch of beginning ch5, sl st into corner ch2 space. (124 dc + 4 ch 1 spaces + 8 ch 1 spaces + 4 ch2 corners)
Gauge Check: 9.5” Diameter

Round 12: Ch5, dc in same ch2 space, *# BPdc 1, FPdc 1, 2dc into ch1 space, FPdc 1, BPdc 5, FPdc2tog, BPdc 4, FPdc3tog, BPdc 4, FPdc2tog, BPdc 5, FPdc 1, 2dc into ch1 space, FPdc 1, BPdc 1 #, [dc, ch2, dc] into corner ch2 space*; repeat between * twice; repeat between # once, join to 3rd ch of beginning ch5, sl st into corner ch2 space. (132 dc + 4 ch2 corners)
Gauge Check: 10.5” Diameter

Round 13: Ch5, dc in same ch2 space, *# BPdc 2, FPdc 4, BPdc 5, FPdc 1, BPdc 4, FPdc 1, BPdc 4, FPdc 1, BPdc 5, FPdc 4, BPdc 2 #, [dc, ch2, dc] into corner ch2 space*; repeat between * twice; repeat between # once, join to 3rd ch of beginning ch5, sl st into corner ch2 space. (140 dc + 4 ch2 corners)

Round 14: Ch1 *[sc, ch2, sc] in corner, working in BLO, sc in each st to next corner*, repeat between * to end, join, sl st into corner ch2 space. (148 sc + 4 ch2 corners)
Round 15 (Color 3): TURN to work from wrong side, ch1 *[sc, ch2, sc] in corner, working in BLO, sc in each st to next corner*, repeat between * to end, join. Fasten off. (156 sc + 4 ch2 corners)
Don’t Forget To Pin the Sintra Square Too!

More Crochet Squares For YOU!


************************************************************************************************
I can't wait to see your finished projects,
so feel free to share them on my Facebook page!
Follow me on…


Sign up for my newsletter and get free patterns, giveaways and
other fun stuff delivered directly to your mailbox!

****************************************************************
I’m always happy to help you with questions regarding my patterns. Send me a message and I'll get back to you as soon as possible. Please feel free to sell finished items from my patterns. Pattern credit is not required, but is always appreciated.
Copyright © 2023 Pattern Paradise. All rights reserved. No part of this publication may be reproduced, distributed, or transmitted in any form or by any means, including photocopying, recording, or other electronic or mechanical methods, without the prior written permission of the publisher.


Everything is beautiful thank you very much.
Can you help me with round 2? The instructions say that the clusters go “around” the given stitch, but the instructions for the cluster say “in” the given stitch. Is it “in” or “around”? And if it’s around, based on the pictures it looks like front post clusters, correct?
It’s around and yes, by default that would be a front post stitch.
Do you have a video tutorial of this? While I’m not a beginner I’m not an expert either. lol It would be so much easier with a turorial. Thank you, Terry
I don’t yet. It’s on the list of “to dos” though.
Too many ads. When I finally get to the pattern, I cannot print it out. Very
frustrating.
I’m sorry you feel that way. The ads are what pay for the free patterns as this is my business and livelihood. If you prefer an ad-free, formatted PDF you could purchase it on Ravelry for a small fee. Also, if you join my newsletter, you will receive notification when the pattern is first released — I often offer the free PDF for a limited time.
This is genius. Thank you
Thank you!
This crocheted square is absolutely gorgeous. Thank you for your generosity. Will make for a beautiful Afghan.
Thank you very much, I’m glad you enjoy it!