Share the Dragonfly Jacket with others – Pin It!

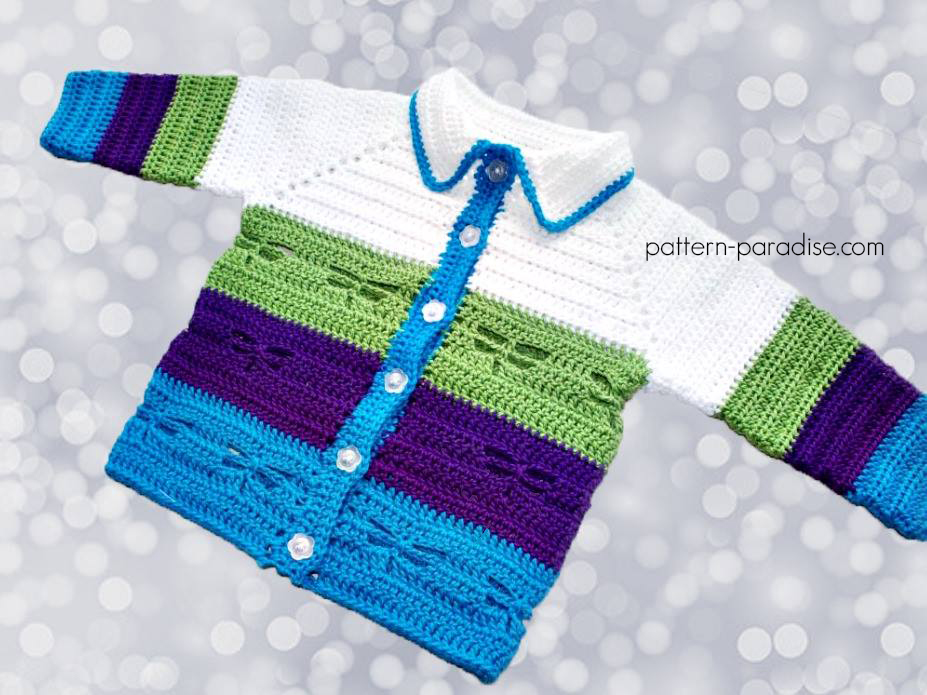
The Dragonfly Jacket is written in two sizes and features a filet style dragonfly motif on the bodice. You can play with color for fun stripes, but it would also look great in a solid color. Either way, I hope you enjoy the pattern!
Dragonfly Jacket
~ Don’t lose it, add It To Your Ravelry Queue Or Favorites ~
~ And don’t forget to Pin It Too ~
* Purchase an ad-free PDF of this pattern on Ravelry*
Find all my FREE crochet patterns HERE


Skill Level: Easy
Measurements:
Size Newborn – 3 Months: Chest = 16″; Length = 8″
Size 6 – 12 Months: Chest = 22″; Length = 13″
Supplies:
- Light worsted or DK weight yarn in 4 colors
A – White; 175 – 200 yards
B – Green; 100 – 120 yards
C – Purple; 100 – 120 yards
D – Blue; 105 – 124 yards - Size 4.0 mm (G) crochet hook or size needed to obtain the gauge
- Yarn needle for weaving in ends
- Buttons (1″) – 5 needed for either size
Gauge: 18 hdc and 13 rows = 4″ (10 cm) PLEASE CHECK YOUR GAUGE
Abbreviations:
ch = chain, dc = double crochet, hdc = half double crochet, hdc2tog = hdc 2 stitches together, sc = single crochet, sl st = slip stitch, spc(s) = space(s), st(s) = stitch(es)
Special Instructions:
- When a number precedes a stitch, such as 3hdc, you will complete that number of stitches in the next stitch.
- When directions are given following parentheses, such as (2hdc, ch2) 3 times, you will do what is in the parentheses that number of times.
- The numbers in ( ) at the end of a row indicates the number of stitches in that row.
- Ch2 at beginning of row counts as hdc.
- Ch3 at beginning of row counts as dc.
- Split Stitch: Working a split stitch means that you will be working into the center “V” of the stitch below, not into the top loops.

* * *
Instructions for Dragonfly Jacket
Size: Newborn – 6 Months
Yoke
Row 1: With Color A, ch48, hdc in 3rd ch from hook and next 6 ch, ch2, hdc next 7 ch, ch2, hdc next 17 ch, ch2, hdc next 7 ch, ch2, hdc last 8 ch. (47 hdc total = 8, 7, 17, 7, 8 by section)
Row 2 to Row 9: Ch2, turn, *hdc to ch2 sp, (hdc, ch2, hdc) in ch2 space*. Repeat between * 3 more times, hdc in remaining sts to end. (111 hdc total = 16, 23, 33, 23, 16 by section)
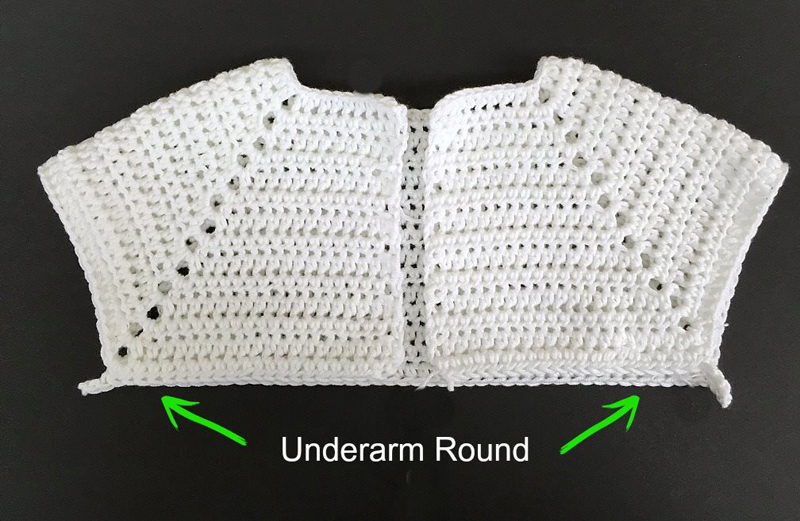
Underarm Round: Ch2, turn, hdc in each st to ch2 space, hdc in ch2 space, ch 3, skip next 23 hdc, hdc in next ch2 space and each st to next ch2 space, ch 3 , skip next 23 hdc, hdc in next ch2 space and each st to end. (69 hdc + 6 ch st) – See Fig. 1 & Fig. 2 at end of post.
Bodice:
Row 1: Join Color B, ch3, turn, working across all stitches including chains, *dc in next st*. Repeat between * to end. (75 dc)
Row 2: Ch3, turn, dc in next 4 sts, *ch4, sk 4 sts, sc in next st, ch4, sk 4 sts, dc in next 5 sts*. Repeat between * 3 more times, ch4, sk 4 sts, sc in next st, ch4, sk 4 sts, dc in remaining sts to end. (30 dc, 5 sc, 10 ch4 spaces)
Row 3: Ch3, turn, dc in next 3 sts, *2 dc in next st, ch3, skip ch4 space and work split sc in sc stitch from previous row, ch3, skip ch4 space, make 2 dc in next st, dc in next 3 sts*. Repeat between * 3 more times, 2 dc in next st, ch3, skip ch4 space and work split sc in sc stitch from previous row, ch3, skip ch4 space, make 2 dc in next st, dc in remaining sts to end. (40 dc, 5 sc, 10 ch3 spaces)
Row 4: Ch3, turn, dc in next 5 sts, *3dc in ch3 space, ch 1, skip next st, 3 dc in ch3 space, dc in next 7 dc*. Repeat between * 3 more times, 3dc in ch3 space, ch 1, skip next st, 3 dc in ch3 space, dc in remaining sts to end. (70 dc, 5 ch1 spaces)
Row 5: Ch3, turn, dc in next 8 sts, dc in ch1 space, dc in each remaining st and ch1 space to end. (75 dc)
Join Color C in first stitch. This section of dragonflies is staggered from the first. If you prefer them stacked, skip to Row 11 and repeat that section twice.
Row 6: Ch3, turn, dc in each st to end. (75 dc)
Row 7: Ch3, turn, dc in next 11 sts, *ch4, sk 4 sts, sc in next st, ch4, sk 4 sts, dc in next 5 sts*. Repeat between * 3 more times, dc in remaining sts to end. (39 dc, 4 sc, 8 ch4 spaces)
Row 8: Ch3, turn, dc in next 10 sts, *2 dc in next st, ch3, skip ch4 space and work split sc in sc stitch from previous row, ch3, skip ch4 space, make 2 dc in next st, dc in next 3 sts*. Repeat between * 3 more times, dc in remaining sts to end. (47 dc, 4 sc, 8 ch3 spaces)
Row 9: Ch3, turn, dc in next 12 sts, *3dc in ch3 space, ch 1, skip next st, 3 dc in ch3 space, dc in next 7 dc*. Repeat between * 2 more times, 3dc in ch3 space, ch 1, skip next st, 3 dc in ch3 space, dc in remaining sts to end. (71 dc, 4 ch1 spaces)
Row 10: Ch3, turn, dc in next 15 sts, dc in ch1 space, dc in each remaining st and ch1 space to end. (75 dc)
Join Color D in first stitch.
Row 11: Ch3, turn, dc in each st to end. (75 dc)
Row 12 to Row 15: Repeat Row 2 to Row 5
Sleeves
Join each round with a sl st to first st of round.
Round 1: With wrong side facing you, join Color A at underarm and ch2, hdc 34 sts evenly around, join. (34 hdc) – See Fig. 3 at end of post.
Rounds 2 to 6: Ch2, turn, hdc in each st around, join. (34)
Sleeve is approximately 1 ¼” from Row 1.
Round 7: Join Color B, ch2, turn, hdc2tog, hdc in each stitch to last 2 sts, hdc2tog, join. (32 hdc)
Rounds 8 to 11: Ch2, turn, hdc in each st around, join. (32)
Sleeve is approximately 3″ from Row 1.
Round 12: Join Color C, ch2, turn, hdc2tog, hdc in each stitch to last 2 sts, hdc2tog, join. (30)
Rounds 13 to 16: Ch2, turn, hdc in each st around, join. (30)
Sleeve is approximately 4 ¾” from Row 1.
Round 17: Join Color D, ch2, turn, hdc2tog, hdc in each stitch to last 2 sts, hdc2tog, join. (28)
Rounds 18 & 19: Ch2, turn, hdc in each st around, join. (28)
Round 20: Ch2, turn, hdc2tog, hdc in each stitch to last 2 sts, hdc2tog, join. (26)
Round 21: Ch2, turn, hdc in each st around, join. (26)
Sleeve is approximately 6 ½” from Row 1.
Last Round (wrong side row): Working with wrong side facing you, ch1, turn, sl st loosely in each st to end. Fasten off.
Button & Buttonhole Bands
Left Front (Button side):
Row 1: With right side of sweater facing you, join Color D to left neckline corner, ch1, sc evenly to hemline border. Hint: I work 5 sc for each 5 hdc rows and 4 sc for each 2 dc rows. Be sure to track how many stitches you end up with so you can work the same number on the right front side.
Row 2 to Row 4: Ch1, turn, sc in same st and in each st to end.
Row 5: Turn, sl st loosely in each sc to end. This will form a ch st finish along the edge of the front opening. Fasten off.
Right Front (Buttonhole side)
Row 1: With right side of sweater facing you, join Color D to lower right front corner, work same number of sc as you did on left front, evenly to neckline.
Row 2: Ch1, turn, sc in same st and in each remaining st to end.
Mark buttonhole placement. Starting with the 2nd st from neckline, mark button placement evenly. You will use 3 sts for each button and split the remaining stitches evenly between buttons.
Row 3 (buttonhole row): Ch1, turn, *sc in each st to buttonhole marking, ch3, skip 3 (this is the actual buttonhole)*, repeat between * to end, sc in last st.
Row 4: Ch1, turn, sc in each st, 3sc in each ch3 space.
Row 5: Turn, sl st loosely in each sc to end. Fasten off.
Collar
Row 1: With right side facing, and starting at right front neckline, join Color A in 1st st of sweater (not the front band), sc in each st to end of sweater (not including front band).
Row 2: Ch1, turn, sc in each st to end.
Row 3 to Row 5: Ch2, turn, hdc in same st and each st to end – this will increase one st per row. Fasten off after last repeat.
Row 6: With right side of collar facing you, join Color A at edge of collar where it attaches to the sweater on the left side opening; work a row of sc around collar, being sure to work 3 sc at each corner. Fasten off.
Border: Join Color D in last st worked of Left front band at neckline, sc across front band and around the collar and left front band. Fasten off.
Sew buttons in place.
* * * * * * * * * * * * * * * * * * * * * * * * * * * * * * * * * * * * * * * * * * * *
Size: 6-12 months
Yoke
Row 1: With Color A, ch56, hdc in 3rd ch from hook and next 7 ch, ch2, hdc next 9 ch, ch2, hdc next 19 ch, ch2, hdc next 9 ch, ch2, hdc last 9 ch. (55 hdc total = 9, 9, 19, 9, 9 by section) 9, 9, 19, 9, 9
Row 2 to Row 13: Ch2, turn, *hdc to ch2 space, (hdc, ch2, hdc) in ch2 space*. Repeat between * 3 more times, hdc in remaining sts to end. (151 hdc total = 21, 33, 43, 33, 21 for each section)
Underarm Round: Ch2, turn, hdc in each st to ch2 space, hdc in ch2 space, ch 5, skip next 33 hdc, hdc in next ch2 space and each st to ch2 space, ch 5, skip next 33 hdc, hdc in next ch2 space and each st to end. (89 hdc + 10 ch st) – See Fig. 1 & Fig. 2 at end of post.
Bodice:
Row 1: Join Color B, ch3, turn, working across all stitches including chains, *dc in next st*. Repeat between * to end. (99 dc)
Row 2: Ch3, turn, dc in each st to end. (99 dc)
Row 3: Ch3, turn, dc in next 2 sts, *ch4, sk 4 sts, sc in next st, ch4, sk 4 sts, dc in next 5 sts*. Repeat between * 5 more times, ch4, sk 4 sts, sc in next st, ch4, sk 4 sts, dc in remaining sts to end. (36 dc, 7 sc, 14 ch4 spaces)
Row 4: Ch3, turn, dc in next st, *2 dc in next st, ch3, skip ch4 space and work split sc in sc stitch from previous row, ch3, skip ch4 space, make 2 dc in next st, dc in next 3 sts*. Repeat between * 5 more times, 2 dc in next st, ch3, skip ch4 space and work split sc in sc stitch from previous row, ch3, skip ch4 space, make 2 dc in next st , dc in remaining sts to end. (50 dc, 7 sc, 14 ch3 spaces)
Row 5: Ch3, turn, dc in next 3 dc, *3dc in ch3 space, ch 1, skip next st, 3 dc in ch3 space, dc in next 7 dc*. Repeat between * 5 more times, 3dc in ch3 space, ch 1, skip next st, 3dc in ch3 space, dc in remaining sts to end. (92 dc, 7 ch1 spaces)
Row 6: Ch3, turn, dc in next 6 sts, dc in ch1 space, dc in each remaining st and ch1 space to end. (99 dc)
Row 7: Ch3, turn, dc in each st to end. (99 dc)
Join Color C in first stitch. This section of dragonflies is staggered from the first. If you prefer them stacked, skip to Row 15 and repeat that section twice.
Row 8: Ch3, turn, dc in each st to end. (99 dc)
Row 9: Repeat Row 8
Row 10: Ch3, turn, dc in next 9 sts, *ch4, sk 4 sts, sc in next st, ch4, sk 4 sts, dc in next 5 sts*. Repeat between * 5 more times, dc in remaining sts to end. (45 dc, 6 sc, 12 ch4 spaces)
Row 11: Ch3, turn, dc in next 8 sts, *2 dc in next st, ch3, skip ch4 space and work split sc in sc stitch from previous row, ch3, skip ch4 space, make 2 dc in next st, dc in next 3 sts*. Repeat between * 5 more times, dc in remaining sts to end. (57 dc, 6 sc, 12 ch3 spaces)
Row 12: Ch3, turn, dc in next 10 sts, *3dc in ch3 space, ch 1, skip next st, 3 dc in ch3 space, dc in next 7 dc*. Repeat between * 4 more times, 3dc in ch3 space, ch 1, skip next st, 3 dc in ch3 space, dc in remaining sts to end. (93 dc, 6 ch1 spaces)
Row 13: Ch3, turn, dc in next 13 sts, dc in ch1 space, dc in each remaining st and ch1 space to end. (99 dc)
Row 14: Ch3, turn, dc in each st to end. (99 dc)
Join Color D in first stitch.
Row 15: Ch3, turn, dc in each st to end. (99 dc)
Row 16 to Row 21: Repeat Row 2 to Row 7
Last Row (wrong side row): Ch1, turn, sl st loosely in each st to end. Fasten off.
Sleeves – Join each round with a sl st to first st of round.
Round 1: With wrong side facing you, join Color A at underarm and ch2, hdc 42 sts evenly around, join. (42 hdc) – See Fig. 3 at end of post.
Round 2: Ch2, turn, hdc in each st around, join. (42)
Round 3: Ch2, turn, hdc2tog, hdc in each stitch to last 2 sts, hdc2tog, join. (40 hdc)
Rounds 4 to 7: Ch2, turn hdc in each st, join. (40)
Sleeve is approximately 1 ½” from Row 1.
Round 8: Join Color B, Repeat Row 3. (38)
Rounds 9 to 13: Ch1, hdc in each st around, join. (38)
Sleeve is approximately 3 ½” from Row 1.
Round 14: Join Color C, Repeat Row 3. (36)
Rounds 15 & 16: Repeat row 2. (36)
Round 17: Repeat Row 3. (34)
Rounds 18 & 19: Repeat row 2. (34)
Sleeve is approximately 5 ½” from Row 1.
Round 20: Join Color D, Repeat Row 3. (32)
Rounds 21 & 22: Repeat row 2. (32)
Round 23: Repeat Row 3. (30)
Rounds 24 & 25: Repeat row 2. (30)
Sleeve is approximately 7 ½” from Row 1.
Last Round (wrong side row): Working with wrong side facing you, ch1, turn, sl st loosely in each st to end. Fasten off.
Button & Buttonhole Bands
Left Front (Button side):
Row 1: With right side of sweater facing you, join Color D to left neckline corner, ch1, sc evenly to hemline border. Hint: I work 5 sc for each 5 hdc rows and 4 sc for each 2 dc rows. Be sure to track how many stitches you end up with so you can work the same number on the right front side.
Row 2 to Row 4: Ch1, turn, sc in same st and in each st to end.
Row 5: Turn, sl st loosely in each sc to end. This will form a ch st finish along the edge of the front opening. Fasten off.
Right Front (Buttonhole side)
Row 1: With right side of sweater facing you, join Color D to lower right front corner, work same number of sc as you did on left front, evenly to neckline.
Row 2: Ch1, turn, sc in same st and in each remaining st to end.
Mark buttonhole placement. Starting with the 2nd st from neckline, mark button placement evenly. You will use 3 sts for each button and split the remaining stitches evenly between buttons.
Row 3 (buttonhole row): Ch1, turn, *sc in each st to buttonhole marking, ch3, skip 3 (this is the actual buttonhole)*, repeat between * to end, sc in last st.
Row 4: Ch1, turn, sc in each st, 3sc in each ch3 space.
Row 5: Turn, sl st loosely in each sc to end. Fasten off.
Collar
Row 1: With right side facing, and starting at right front neckline, join Color A in 1st st of sweater (not the front band), sc in each st to end of sweater (not including front band).
Row 2: Ch1, turn, sc in each st to end.
Row 3 to Row 7: Ch2, turn, hdc in same st and each st to end – this will increase one st per row. Fasten off after last repeat.
Row 8: With right side of collar facing you, join Color A at edge of collar where it attaches to the sweater, work a row of sc around collar, being sure to work 3 sc at each corner. Fasten off.
Border): Join Color D in last st worked of Left front band at neckline, sc across front band and around the collar and left front band. Fasten off.
Sew buttons in place.
Click on an image to enlarge.
-

- Fig. 1

-

- Fig. 2
-

- Fig 3

Want more dragonflies?


************************************************************************************************
I can't wait to see your finished projects,
so feel free to share them on my Facebook page!
Follow me on…


Sign up for my newsletter and get free patterns, giveaways and
other fun stuff delivered directly to your mailbox!

****************************************************************
I’m always happy to help you with questions regarding my patterns. Send me a message and I'll get back to you as soon as possible. Please feel free to sell finished items from my patterns. Pattern credit is not required, but is always appreciated.
Copyright © 2023 Pattern Paradise. All rights reserved. No part of this publication may be reproduced, distributed, or transmitted in any form or by any means, including photocopying, recording, or other electronic or mechanical methods, without the prior written permission of the publisher.


Hi, first of all thank you so much for the pattern for this lovely cardigan.
I’m having a daft moment
On row 3 of bodice could you explain the part where it says to work a split sc? What does that mean
Thank you
You work it in the center of the previous sc. There is a photo of what it looks like at the top of the pattern, where the materials and notes are – that should help.
I did eventually figure out the sleeves and finish the sweater. The recipient was pleased. Thank you for taking the time to answer my questions. I’ll share a picture if I can figure out how. Mines not nearly as pretty as yours but not bad for a first try.
Glad you enjoyed it!
Okay so I figured out the yoke and the bodice but now the sleeves are confusing me. Turning after each round makes it difficult for me to tell where the first and last stitches no are. Also my sleeve is coming out a little longer than the pattern States it should. Any tips. Please and thank you.
I’m sorry, I don’t have any tips for counting the stitches. I just make sure I start counting in the stitch where I joined after I turn. As for the length of the sleeves, you could try a different shaped hook (necks on the hooks are different from brand to brand) and make a gauge swatch to see if that helps, or you could reduce the number of rounds to stick to the pattern dimensions.
can not figure the yoke out. no matter what i do the numbers are wrong.
looking for a new pattern wasted too much time on this one
I’m sorry you are having trouble. I’ve checked the pattern and the stitch count is correct. Be sure you are counting the beginning ch2 as a stitch and be sure you are working in each stitch from the previous row plus making the proper increase in the ch2 spaces.
I cant get the numbers to come out. how many new hdc am i suppose to have per row in order for it to come out on row 9 at 111 stitches.
Thanks
Sue
Hi Sue. You should be increasing by 8 hdc on each row. Please let me know if you have any other questions. ~ Janaya
thank you I finally figured it out i was increasing it by 8 but it was still not coming out to 111 and then I figured out why. So now its working for me.
Sue
Can you please explain it to me? I can’t figure it out. Am I supposed to to hdc 2 or 3 in each stitch or how do you do the increase?
The increases are made by working a (hdc, ch2, hdc) in each ch2 space, as noted in the pattern. This will give you an increase of 8 stitches per row.
Thank you! Thank you Janaya and Maria!!! This jacket is lovely . . . the little dragonflies and the color choices!!
You are welcome!