Pin the Bristol Hat For Later!
Add this hat to your Ravelry Favorites!

Bristol Hat
The Bristol Hat was designed for the Hat Of The Month Club hosted by Oombawka Design and The Stitchin’ Mommy. Be sure to check out Rhondda’s Cold Weather Hat HERE and Amy’s Adalia Hat HERE or click the graphic below for more information on this CAL including the schedule!

I made my Bristol Hat sample with yarn from my stash. Unfortunately, it is a discontinued yarn (that I loved), but there are lots of other options to choose from. I used a #4 medium weight worsted, but you could really use almost any yarn you like, just be sure to adjust the hook size to the recommended one for your yarn plus one size larger.


Bristol Hat
Scroll down for the free pattern
~or~
Purchase an ad-free PDF version on Ravelry
And don’t forget to Pin It Too
Find all my FREE crochet patterns HERE
For the Bristol Hat I chose a simple stitch that provides lots of texture for solid colors, but I think it lends itself nicely to multi color versions too! This stitch pattern is an easy version of a half double crochet variation combined with a single crochet band that’s worked on the diagonal.
I sized the hat for the average adult, however, you can modify the sizing to your needs. Adjust the band smaller or larger by adjusting the number of rows and then work the hat section as long as you like before you start the decreases. I love patterns that can be adjusted to your needs!
![]()
Size: Average adult – fits head circumference 19″ – 23″
If you wish to make the hat larger or smaller, adjust the beginning band length accordingly and adjust the number of rows on the hat before the decreases.
Materials:
- Medium Weight (#4) yarn, approximately 300 yards.
- Hook Clover Amour H/5.00 mm & I/5.50 mm
- Stitch Marker
- Tapestry needle for weaving ends
Did you know I have a shop on Amazon featuring some of my favorite tools and gadgets? Click the link below to visit my shop and get your supplies, at great prices, fast and easy.
Gauge: 10 shells = 6”
Abbreviations (US Terms):
BLO: back loop only
ch: chain
DEC: decreases
hdc: half double crochet
sc: single crochet
sl st: slip stitch
st(s): stitch(es)
YO: yarn over
Special Stitches
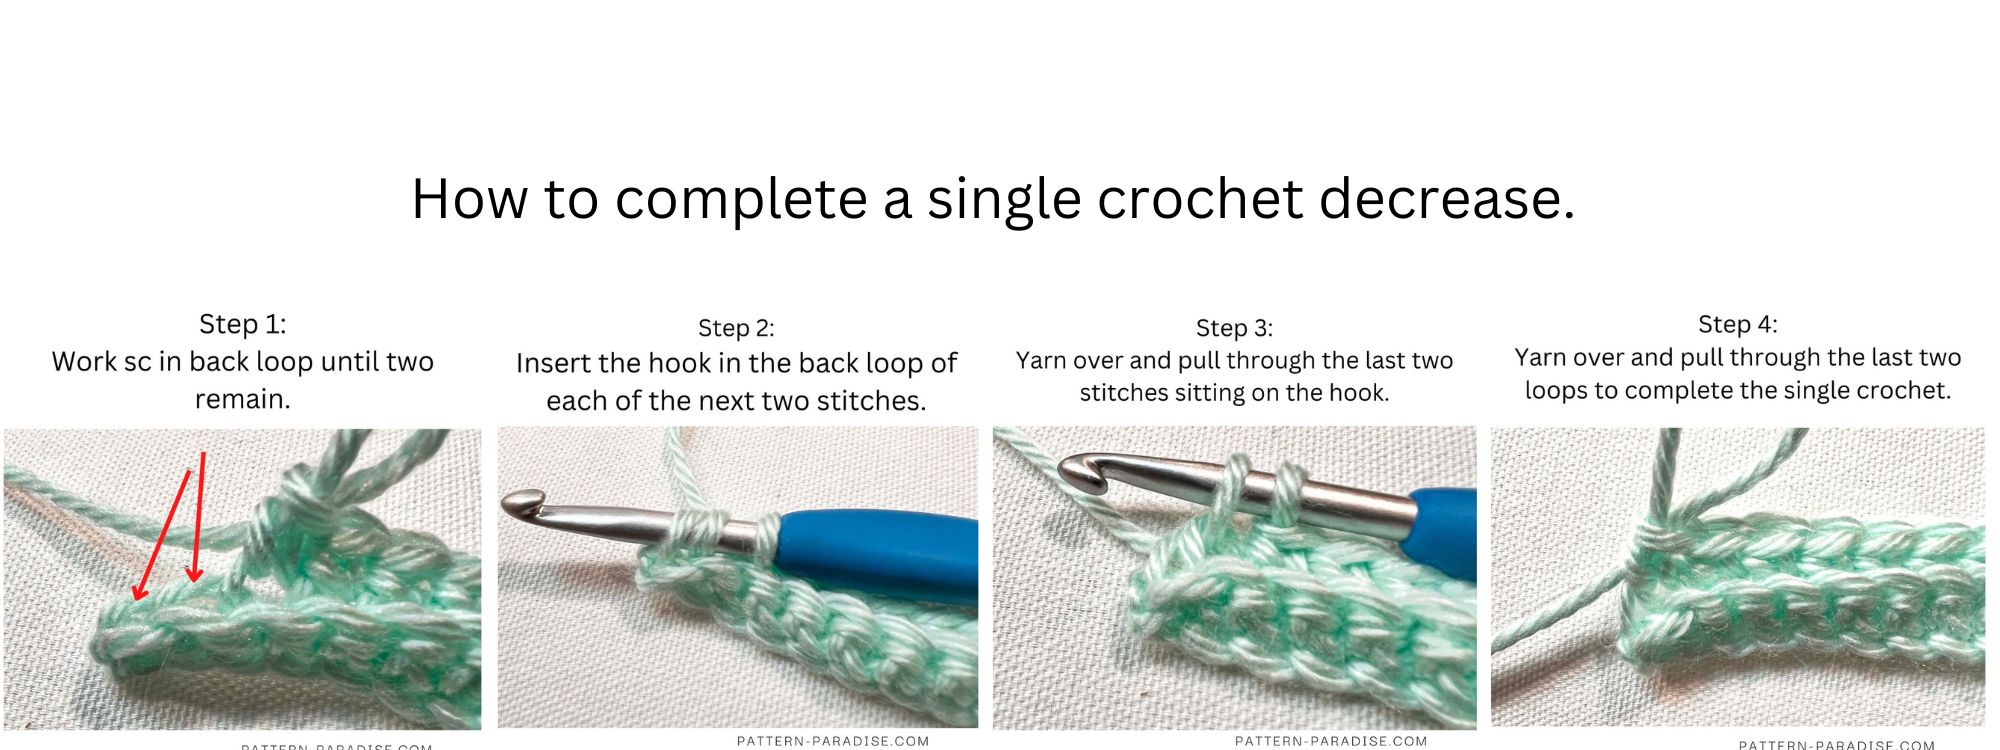
scDEC (single crochet decrease): Insert hook into back loop only of next two stitches, YO, pull loop through the two stitches, YO, pull loop through the two loops on hook to complete the single crochet.
Shell: YO insert hook in same space as last st made, YO, pull loop through (3 loops on hook), *YO, insert hook in next st, YO, pull loop through*, repeat between * once (7 loops on hook), YO, pull through all loops on hook, ch1.
ShellDC (Shell Decrease): YO, insert hook in same space as last st made, YO, pull loop through (3 loops on hook), *YO, SKIP NEXT ST, insert hook in next st, YO, pull loop through*, repeat between * once (7 loops on hook), YO pull through all loops on hook, ch1.
Notes:
- Pattern written in US Standard terms.
- The number in ( ) at end of row indicates the number of stitches in that row.
- Ch1 at beginning of row DOES NOT count as a stitch.
This pattern calls for working in the Third Loop. The Third Loop is the one on the back of the hdc, directly below the Back Loop. You can find a photo tutorial on my website that shows the differences between working in the various loops.
I used a #4 worsted yarn I had in my stash (that has been discontinued) but you can use almost any yarn that provides the stitch definition and drape you like. Simply adjust the hook size to the one recommended for your yarn plus another hook one size bigger (if you crochet tightly, you might want to go up two sizes).
The hat size can be easily adjusted by adjusting the band length and then number of rounds in the main part of the hat. I’ve provided guidance throughout the pattern to help you out.


Bristol Hat Instructions — Show it some love on Ravelry
Band
Row 1: Working with smaller hook, ch13, working in back bump, skip first ch, 2sc in next ch, sc in each ch until there are two left, scDEC over last two stitches. (12 sc)
Note: Place a stitch marker in the last stitch to remind you that you will decrease on that side in each row.
Row 2: Ch1, turn, working in BLO, scDEC over first two stitches, sc in each st until 1 remains, 2sc in last st. (12 sc)
Row 3: Ch1, turn, working in BLO, 2sc in first st, sc in each st until two remain, scDEC over last two stitches. (12 sc)
Repeat Rows 2 and 3 until you have 61 rows (or the desired length of your band being sure to have an odd number of rows).
Join Band Ends Together: Turn work so that Row 1 is closest to you, match the stitches in Row 1 with those in your last Row, pull the loop of your last stitch through both loops of the first stitch in Row 1 (the one with the stitch marker in it), ch1. Working from the Row 1 side to the Last Row side, insert hook into both loops of Row 1 and BLO of the stitch in the Last Row, YO, pull loop through to complete a sl st. Using the same technique, sl st in each st to end, to complete the joining seam. You should have an invisible join on the outside of your work!
Hat Body
The rest of the hat is worked in joined rounds.
Round 1: Turn to work along ends of Band rows, ch1, starting in first st, *2hdc, hdc in next 6 sts*; repeat between * to end (the last repeat will only have 4 hdc and not 6), join with sl st to top of first hdc. (70 hdc)
Note: If you adjust the length of the band your stitch count will be different, just be sure you end up with an even number of hdc and it should be roughly 10% more than the number of rows in the band. Example: if you have 51 rows in the band you should have approximately 56 hdc (10% of 51 = 5; 51+5=56).
Change to larger hook and work remainder of hat with this hook.
Round 2: Ch1, working in Third Loop, hdc in each st to end, join with sl st to top of first hdc. (70 hdc)
Round 3: Ch1, working in Third Loop and starting in first st, Shell until one st remains, the last Shell is worked over the last st made, the next st and the same st as the first loop of the first st. (35 Shells)
Round 4: Ch1, starting in next st, Shell until one st remains, the last Shell is worked over the last st made, the next st and the same st as the beginning ch1. (35 Shells)

Repeat Round 4 until hat measures approximately 6-7” from bottom of band, or the desired finished length, less about 5”.
Crown Section
This is the section where you will work your decreases. You will be making a certain number of decreases in certain rounds. If you have adjusted your band width, you will have to figure out the spacing of the decreases based on how many Shells you have in your round. I will identify the number of decreases for each round so you can figure out the math, however, if you decide to make the hat very small (baby size) or significantly larger, you may have to either increase or decrease the number of decreases in the round.
Crown Round 1 (4 Shell decreases): Ch1, starting in next st, work *6 Shells, ShellDC*; repeat between * to end (note last repeat will have fewer shells than the total repeat, just work to the end of the round), join to first st of round. (31 Shells)
Crown Round 2 (0 Shell decreases): Ch1, starting in next st, Shell until one st remains, the last Shell is worked over the last st made, the next st and the same st as the beginning ch1, join to first st of round. (31 Shells)
Crown Round 3 (4 Shell decreases): Ch1, starting in next st, work *5 Shells, ShellDC*; repeat between * to end (note last repeat will have fewer shells than the total repeat, just work to the end of the round), join to first st of round. (27 Shells)
Crown Round 4 (0 Shell decreases): Repeat Crown Round 2. (27 Shells)
Crown Round 5 (4 Shell decreases): Ch1, starting in next st, work *4 Shells, ShellDC*; repeat between * to end (note last repeat will have fewer shells than the total repeat, just work to the end of the round), join to first st of round. (23 Shells)
Crown Round 6 (0 Shell decreases): Repeat Crown Round 2. (23 Shells)
Crown Round 7 (4 Shell decreases): Ch1, starting in next st, work *3 Shells, ShellDC*; repeat between * to end (note last repeat will have fewer shells than the total repeat, just work to the end of the round), join to first st of round. (19 Shells)
Crown Round 8 (9 Shell decreases): Ch1, ShellDC to end, skip the last st and beginning ch1 st, join to first st of round. (9 Shells)
Closing Crown: Fasten off yarn leaving a 12” end. Thread the end onto a tapestry needle and working from the inside of the hat, weaver in and out of stitches in last round (I like to go around twice) then pull yarn tight to close hole. Weave in ends well to secure the hole closed. Fasten off.
You can add a pompom if you like too! I have an easy tutorial that can help you.
Pin It For Later!

I can't wait to see your finished projects,
so feel free to share them on my Facebook page!
Follow me on…


Sign up for my newsletter and get free patterns, giveaways and
other fun stuff delivered directly to your mailbox!

****************************************************************
I’m always happy to help you with questions regarding my patterns. Send me a message and I'll get back to you as soon as possible. Please feel free to sell finished items from my patterns. Pattern credit is not required, but is always appreciated.
Copyright © 2023 Pattern Paradise. All rights reserved. No part of this publication may be reproduced, distributed, or transmitted in any form or by any means, including photocopying, recording, or other electronic or mechanical methods, without the prior written permission of the publisher.


