Sea Glaze Poncho
The Sea Glaze Poncho is a pretty topper, perfect layered over skirts, slacks, shorts, jeans… whatever you like! It has a lacy stitch that makes it a little lighter for those chilly summer, spring or fall nights.

~ Don’t lose it, add It To Your Ravelry Queue Or Favorites ~
~ And don’t forget to Pin It Too ~
* Purchase an ad-free PDF of this pattern on Ravelry*
Find all my FREE crochet patterns HERE
*****
I made a simple, clean border, but I think it would take on a cool boho look if you added a bit of fringe, right? The color work is all courtesy of the yarn. Red Heart sent me some Super Saver Stripes yarn for this project and I love the long color changes. The colors are vibrant and clean and the yarn is pleasant to work with, just like the usual super saver!

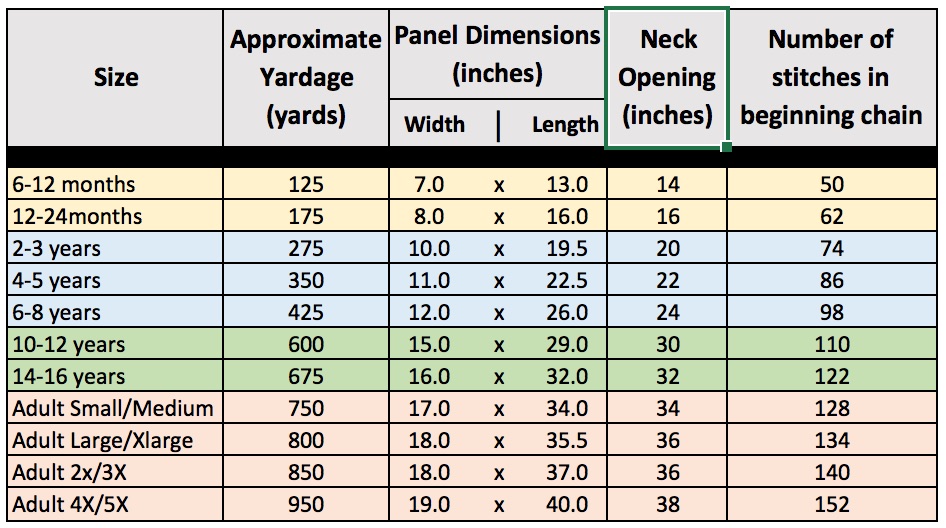
I sized this poncho from Baby to and including 5X!

See the coordinating Sea Glaze Hat pattern too!

**************
Pattern Instructions
Size: Baby, Child, Young Adult, Adult
Materials:
- Worsted Weight yarn, I used Red Heart Super Saver Stripes – 236 yards per skein, in color Cool Stripe (see yardage in table below)
- Hook US I/5.50 or size needed to obtain the gauge
- Yarn needle for weaving in ends
Gauge: 15 dc x 8 Rows = 4″ (10 cm); Stitch multiple 6 + 2
Abbreviations:
BP: Back Post
ch: chain
dc: double crochet
FP: Front Post
hdc: half double crochet
sc: single crochet
sl st: slip stitch
st(s): stitch(es)
tog: together
- Pattern written in US terms
- Repeat instructions between [ ] as specified
- Weave ends as you work
Panel – Make 2
Row 1: Ch the number of stitches indicated in the last column of the chart above based on the size you are making, sc in 2nd ch from hook and each remaining ch. (Your stitch count throughout will be 1 st less than your beginning chain)
Row 2: Ch3 (counts as dc here and throughout), turn, [ch2, skip 2, sc in next st, ch2, skip 2, dc in next st] repeat to end.
Row 3 (Right Side Row): Ch3, turn, [5dc in next sc, dc in next dc], repeat to end.
Repeat Rows 2 and 3 (ending with a Row 2 repeat) until piece measures 1” less than the width measurement from the chart above.
Turn to work down short side to make a neat end for joining (you only work down one short end, NOT all around the panel), ch1, 2sc in side of each row to end. Fasten off.
Joining
Match sts as shown in photo, working through both loops, slip stitch across to join. Fasten off.

Repeat for second side.
Neckline
Round 1: Join one st to the right of center V, ch1, sc in same st, sc in V join, sc evenly to next V, sc in V join, sc evenly to end, join with sl st to first st. Be sure to have an even number of stitches and the same number of stitches on either side of V at seams.
Round 2: Ch1, starting in same st, hdc3tog (you will use the center st of the V plus the one before and after it), work hdc in each st to next V, hdc3tog, hdc to end, join with sl st to first hdc.
Round 3: Ch1, hdc in hdc3tog, [FPdc around next st, BPdc around next st], repeat to next hdc3tog, hdc in the hdc3tog, repeat between [ ] to end, join with sl st to first hdc.
For 6-12 and 12-24month size, skip to Last Round. For all other sizes work Rounds 4 and 5.
Rounds 4 and 5: Ch1, skip first FPdc,* [BPdc around next BPdc, FPdc around next FPdc]*, repeat until there is one to BPdc and FPdc before the next V, FPdc2tog over the next 2 FPdc (work over the next two FPdc skipping the sts between); repeat between * to end, FPdc2tog over the next 2 FPdc, join with sl st to first post st.
Last Round: Ch1, sc in each st to end, join with sl st to first st. Fasten off.
Border
Round 1: Join at bottom point, ch1, 3sc in same st, sc evenly to next point, 3sc in point, sc evenly to end, join with sl st to first st. Note: I work 2sc in the side of each dc row and 1 sc in each st when working along rows. Just be sure your hem lies flat and you have the same number of stitches on either side of the Vs.
Round 2: Sl st into corner st, ch1, 3sc in corner, sc in each st to next corner, 3sc in corner, sc in each st to end, join with sl st to first st. Fasten off.
Repeat Round 2 until border is desired width – I did 3 rounds in total.
Add fringe if desired.
Don’t Forget to Pin It!


I can't wait to see your finished projects,
so feel free to share them on my Facebook page!
Follow me on…


Sign up for my newsletter and get free patterns, giveaways and
other fun stuff delivered directly to your mailbox!

****************************************************************
I’m always happy to help you with questions regarding my patterns. Send me a message and I'll get back to you as soon as possible. Please feel free to sell finished items from my patterns. Pattern credit is not required, but is always appreciated.
Copyright © 2023 Pattern Paradise. All rights reserved. No part of this publication may be reproduced, distributed, or transmitted in any form or by any means, including photocopying, recording, or other electronic or mechanical methods, without the prior written permission of the publisher.


I made this! Wish I could share a pic of the finished project!! Thx for a great pattern!
Share it in my email! [email protected]
What do you mean by 1 inch less than the chart above?
Look at the width measurement (in the chart) for the size you are making, and work the piece until it is 1″ less than that. So for example for the smallest size it says the width is 7″, work the piece until it is 6″ before you move to the next instruction.
When you join, are the panels on the wrong side?
You join from the wrong side, yes.
So beautiful. Love the colours.
But I didn’t understand why the pattern says “Repeat Rows 2 and 3 (ending with a Row 2 repeat) until piece measures 1” less than the width measurement from the chart above.”
That is the repeat necessary to work the pattern. If you have more questions, please reach me via email.
I find the instructions for joining the two pieces very confusing. One picture with A and B just doesn’t really show me how to join them. Can you help me? Thanks
If you match up the letter As and the letter Bs, where they connect is where you join. Then turn it around and do the same for the other side – back and front are exactly alike. I may add a quick video for this in the future, but in the meantime, I hope that helps.
I’m a little confused with Row 2. It says “Ch3 (counts as dc here and throughout), turn, [ch2, skip 2……”. So do you ch 5, then skip 2 chains and carry on from there?
That’s correct. I’m sorry it was confusing. By writing it this way it keeps the repeat consistent and the instructions simpler by not having to write a different set of instructions for the first repeat.
This looks like a beautiful pattern so I’ve started one for my daughter but encountered an issue in the first round of lace stitches. It says skip to 2 stitches and DC in the third Etc all the way across but when I get to the end there’s one remaining Stitch. I’m doing the six to eight year old pattern with 98 stitches in the start so I’m a little lost as to how to make it even out. Any help?
You will chain 98 but work the first st in the 2nd chain from the hook, so you will end up with 97 sts. With the 6 stitch repeat it should work out.
This is such a cute pattern!
This is such a cute pattern! Thank you for sharing. I am making 3 of these. I also ended up with a remaining stitch at the end of row 2 for the 4-5 yr old pattern. i had to go back and reduce the beginning chain count to 85. So I will do the same for the 6-8 yr old pattern.
Hi there, thank you for your note! I rechecked the stitch count and it is correct. Don’t forget the beginning ch3 counts as a dc, so you don’t work in the very first stitch, perhaps that’s where the discrepancy came in.
Looks like in the picture you ended with row 2 not row 3 for both panels. Am I seeIng this correctly?
You are correct, thank you! Adjustment has been made to the pattern.
I don’t understand this part in the poncho.
Turn to work down short side to make a neat end for joining (you only work down one short end, NOT all around the panel), ch1, 2sc in side of each row to end. Fasten off.
OK, I’m happy to help, what part are you having trouble understanding?