Click HERE to add this pattern to your Ravelry Queue

Casablanca Crochet Square
Scroll down for the free pattern
~or~
Purchase an ad-free PDF version on Ravelry
And don’t forget to Pin It Too
Find all my FREE crochet patterns HERE
The Casablanca Square is full of texture that comes from the overlay crochet. I really love this square. I think it’s so elegant and would make such a beautiful throw… hmmm, maybe … plans for the future 🙂 And, can you imagine it in a thread as a bedspread? Of course, if your ambitions are a little less lofty, you could make two and join them for a pretty throw pillow for a touch of elegance in any room.
The Casablanca Square is made with overlay crochet, which is a technique using post stitches and color to create a 3D effect. If you look around, you will see many mandalas made with this technique and they are full of rich and bright colors; however, for this square I wanted to keep it simple and used only 2 colors, of course, you may use as many as you like! I know this square looks complicated, but it really isn’t bad. It is rated as an intermediate square, but with a few tips (which I share below, a little patience, and working one step at a time, I think even the beginner could achieve this square.
I designed these crochet squares using 2 colors (well actually I used 3 colors but no more than 2 in one square) in Red Heart With Love yarn. I really liked working with this yarn and you can read my yarn reviews for the details.

The instructions for this square include two methods. The first is the method I used for the dark grey square. Here I used the tapestry crochet method to carry yarns and I only worked the post stitches, bobbles or clusters in the lighter color. I carried the unused yarn and worked over it with the darker yarn as I went along. This gives you a nice crisp color contrast and I really like the effect.

The second method, which is easier and does not require working over the color not in use, was used on the green square. Here I just crocheted each round in the designated color and fastened off at the color changes. I like this one too, but you can see that there are “stripes” of the lighter color that peek through the design, so it’s not as crisp.

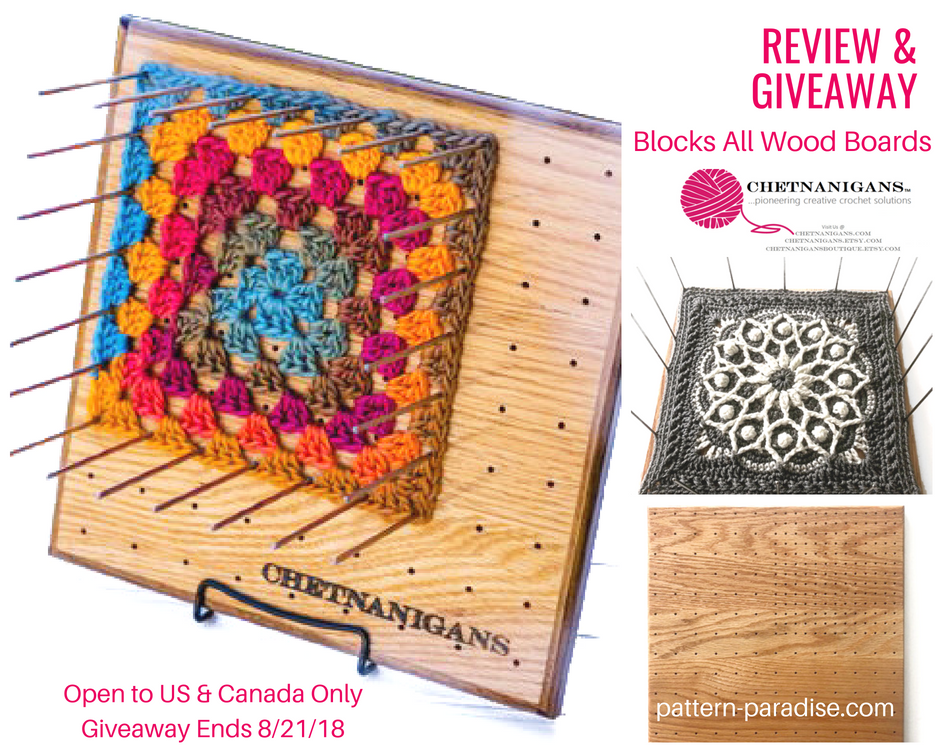
I used the Chetnanigans BlocksAll Board to block my squares and I loved this tool! You can read my review and enter the giveaway to win one of your own right HERE!
*****
Instructions
Size: 12” Square
Materials:
- Worsted Weight yarn, I used Red Heart With Love in two colors
- Color 1 = Pewter or lettuce – 100 yards
- Color 2 = Eggshell – 75 yards
- Hook J/6.00 mm
- Stitch Markers
- Tapestry needle for weaving ends
Did you know I have a shop on Amazon featuring some of my favorite tools and gadgets? Click the link below to visit my shop and get great products, at great prices, fast and easy.
Gauge: Check diameter measurements as noted in pattern.
Abbreviations (US Terms):
ch: chain
dc: double crochet
FP: front post
hdc: half double crochet
sc: single crochet
sl: slip
st(s): stitch(es)
tog: together
tr: treble crochet
Special Stitches:
CL = tr2tog in the same stitch – This is a cluster stitch, but I find it easier to think of it as working 2 tr stitches together in one. To make this stitch work a tr crochet until you have 2 loops left on the hook, then work another in the same stitch until you have 3 loops on the hook, yarn over and pull through all loops.
Bobble = dc4tog in the same stitch – This is similar to the concept for the CL above. You will work 4 dc in the same stitch but only complete each of them halfway, then you will yarn over and pull the yarn through all 5 loops on the hook.
I have a Tapestry Crochet Tutorial which might be helpful if you are not familiar with how to make the color changes and carry the unused yarn. You may find it at:
Tapestry Crochet Tutorial Bit.ly/TapestryCrochet
This square is rated as intermediate because of the post stitches, bobbles and tapestry crochet; however, if taken one step at a time, I am confident that even a beginner will get good results!
This square makes use of overlay crochet which gives it the 3D appearance of one color crocheted on top of another. This effect is achieved by simply changing colors and working post stitches in the stitch 2 or 3 rounds below the current round. The square can be worked in two ways.
- Method 1: This requires working with both colors in the same round and crocheting over the color not in use at the moment, as in tapestry crochet (see tutorial). The grey and ivory square was completed using this method and you can see it is crisp with very little “striping” from the contrast color. For the noted rounds where two colors are used in the same round, work all stitches in Color 1 (the background color) except for the FP stitches, Bobbles or CL stitches – those are worked in Color 2, the lighter color. For ease of reading, I’ve written the stitches to be worked in Color 2 in blue and bolded them.

- Method 2 (Easier): Work each round in the color for that round (as usual). The green and ivory square was completed using this method and you can see distinct “stripes” peeking through, for the rounds with color changes.
General Notes:
- Weave ends as you work.
- The beginning ch1 or ch2 of a round does NOT count as a stitch, unless noted.
- Numbers in ( ) at end of round indicate the number of stitches in that round.
- Join rounds with a slip stitch to first stitch of the round.
- Start each round in the same stitch as the join.
- When a number follows a stitch, it means to work that stitch in the number of stitches indicated, (example: sc 3 means work a single crochet in each of the next 3 stitches).
- When a number precedes a stitch, it means to work the number indicated in the next stitch, (example: 3dc means work 3 double crochets in the next stitch).
Helpful Tips:
- Counting is important, to avoid frogging and frustration, check your stitch count for each round!
- Don’t work the FP stitches too tightly or they will pull and pucker the work.
- Be sure to leave an unworked stitch behind each FP stitch, except where noted.
- When working rounds 15 to 19, I state to fasten off and join in the corner, however, if you prefer to minimize the number of ends to weave, you may sl st in each stitch until you reach the corner.
Method 1 (grey and ivory square):
Work blue bolded stitches in Color 2, all other stitches are worked in Color 1. When working two colors in the same round, use the tapestry crochet method to work over yarn not in use (see tutorial link above).
For rounds 1 to 8 you may either fasten off at color changes or carry the unworked yarn to the next applicable round.
With Color 1, ch4, sl st in first ch to form loop.
Round 1: Ch4 (counts as dc + ch1), [dc, ch1 in center of loop] 11 times, join to 3rd st of beginning ch4. (12 dc + 12 ch)
Round 2: Ch1, sc in each dc and ch1 space to end, join. (24)
Round 3: Join Color 2, ch2 (does not count as st), working around dc 2 rows below, *CL around next dc, 2sc in next st*, repeat between * to end, join. (36)

Round 4: Ch1, sc in each CL and sc to end, join. (36 sc)
Round 5: Ch1, *hdc 2, 2 hdc in next st*, repeat between * to end, join. (48 hdc)
Gauge Check: Diameter = 4.5”
Round 6: Join Color 2 in the st directly above the CL in Round 3,

Ch1, *FPtr around CL two rows below, sc next 3 sts*, repeat between * to end, join. (48 sts)

Round 7: Ch1, *sc 3, 2sc in next st*, repeat between * to end, join, sl st into next st. (60 sc)
Round 8: Ch1, sc 3 (this should bring you to the stitch between two FPtr 2 rows below),

Join Color 2, *FPtr2tog working around tr to the right and tr to the left of current position, sc 4*, repeat between * until 2 sts remain, FPtr2tog, sc in last st, join. (12 FPtr2tog + 48 sc]

This is what it should look like after Round 8

Round 9: Ch1, sc 3, *2sc in FPtr2tog, sc next 4 sts*, repeat between * until 2 sts remain, 2sc in FPtr2tog, sc in last st, join. Fasten off. Place stitch marker in any stitch directly above FPtr2tog. (72 sc)
Gauge Check: Diameter = 6.5”

Round 10: Tip: Check that the bobbles are sitting in the center of the “V” shape formed by the post stitches in Round 6 as you go along.

TURN to work from wrong side, join Color 1 in marked stitch, ch1, sc in the same st and next 2 sts, join Color 2, *Bobble in next st, sc 5* repeat between * until 3 sts remain, Bobble in next st, sc in last 2 sts, join. (12 Bobbles + 60 sc)
This is what it should look like after Round 10

Round 11: Join Color 2, TURN to work from right side, ch1, *FPtr around the FPtr2tog 3 rows below, ch1, work another FPtr around the same FPtr2tog (skip only 1 stitch, not two), sc 5*, repeat between * to end, join. (84 sts + 12 ch1 spaces)

Round 12: Ch1, *sc in FPtr, 2sc in ch1 space, sc in next FPtr, sc 5*, repeat between * to end, join. (108 sc)
Gauge Check: Diameter = 8.5”
Round 13: Ch1, sc in each st to end, join. Fasten off. (108 sc)
Look at Round 11, choose the first FPtr of a grouping where there are two together, trace it to the sc above it in Round 13, then count 1 stitch to the right and mark that stitch.

Round 14 (Worked in Color 2): Tip: This round will form the corners to transition from a circle to a square.
Entire round is worked in Color 2 join yarn in marked stitch, ch1, starting in same st, *sc 1, hdc 1, dc 1, ch2, dc 1, hdc 1, sc 1, [FPtr around FPtr to the right three rows below, sc 1, FPtr around FPtr to the left three rows below, sc 6], repeat between [ ] once; FPtr around FPtr to the right three rows below, sc 1, FPtr around FPtr to the left three rows below*; repeat between * to end, join. Fasten off. (27 sts on each side + ch2 in each corner)

Round 15: Join in any corner, ch2, *{3dc, ch2, 3dc} in corner space, hdc 2, 2dc, [FPdc2tog around next two FPtr (skip sc between the two FPtr), sc 6] repeat between [ ] once, FPdc2tog around next two FPtr (skip sc between the two FPtr), 2dc, hdc 2*; repeat between * to end, join. Fasten off. (29 sts on each side + ch2 in each corner)
Round 16: Join in any corner, ch1, *[sc 1, ch2, sc 1} in corner, sc 5, hdc 1, dc 3, hdc 1, sc 4, hdc 1, sc 4, hdc 1, dc 3, hdc 1, sc 5*, repeat between * to end, join. Fasten off. (31 sts on each side + ch2 in each corner)
Round 17: Join in any corner, ch2, *5dc in corner, leave next st unworked, [skip next st, dc 1, working in front of stitch just made, dc in skipped st], repeat between [ ] to corner*; repeat between * to end, join. Fasten off. (15 crossed sts on each side + 5dc in each corner)
Round 18: Join in center dc of corner, ch1, *3sc in corner, working in back loop only, sc in each st to next corner*, repeat between * to end, join. Fasten off. (34 sts on each side + 3sc in each corner)
Round 19: Join in center sc of corner, ch1, *{sc, hdc, sc} in corner, working in back loop only, sc in each st to next corner*, repeat between * to end, join. Fasten off. (36 sts on each side + 3sc in each corner)
*******************
Method 2 (green and ivory square):
- Work all rounds in Color 1, unless otherwise noted.
- You may carry the unused yarn or fasten off at color changes.
- Refer to photos from Method 1 above.
With Color 1, ch4, sl st in first ch to form loop.
Round 1: Ch4 (counts as dc + ch1), [dc, ch1 in center of loop] 11 times, join to 3rd st of beginning ch4. (12 dc + 12 ch)
Round 2: Ch1, sc in each dc and ch1 space to end, join. (24)
Round 3 (Color 2): Ch2 (does not count as st), working around dc 2 rows below, *CL around next dc, 2sc in next st*, repeat between * to end, join. (36)
Round 4: Ch1, sc in each CL and sc to end, join. (36 sc)
Round 5: Ch1, *hdc 2, 2 hdc in next st*, repeat between * to end, join. (48 hdc)
Gauge Check: Diameter = 4.5”
Round 6 (Color 2): You should be in the st directly above the CL in Round 3. Ch1, *FPtr around CL two rows below, sc next 3 sts*, repeat between * to end, join. (48 sts)
Round 7: Ch1, *sc 3, 2sc in next st*, repeat between * to end, join, sl st into next st. (60 sc)
Round 8 (Color 2): Ch1, sc 3 (this should bring you to the stitch between two FPtr 2 rows below), *FPtr2tog working around tr to the right and tr to the left of current position, sc 4*, repeat between * until 2 sts remain, FPtr2tog, sc in last st, join. (12 FPtr2tog + 48 sc]
Round 9: Ch1, sc 3, *2sc in FPtr2tog, sc next 4 sts*, repeat between * until 2 sts remain, 2sc in FPtr2tog, sc in last st, join. Fasten off. Place stitch marker in any stitch directly above FPtr2tog. (72 sc)
Gauge Check: Diameter = 6.5”
Round 10 (Color 2): Tip: Check that the bobbles are sitting in the center of the “V” shape formed by the post stitches in Round 6 as you go along.
TURN to work from wrong side, join yarn in marked stitch, ch1, sc in the same st and next 2 sts, *Bobble in next st, sc 5* repeat between * until 3 sts remain, Bobble in next st, sc in last 2 sts, join. (12 Bobbles + 60 sc)
Round 11 (Color 2): TURN to work from right side, ch1, *FPtr around the FPtr2tog 3 rows below, ch1, work another FPtr around the same FPtr2tog (skip only 1 stitch, not two), sc 5*, repeat between * to end, join. (84 sts)
Round 12: Ch1, *sc in FPtr, 2sc in ch1 space, sc in next FPtr, sc 5*, repeat between * to end, join. (108 sc)
Gauge Check: Diameter = 8.5”
Round 13: Ch1, sc in each st to end, join. Fasten off. (108 sc)
Look at Round 11, choose the first FPtr of a grouping where there are two together, trace it to the sc above it in Round 13, then count 1 stitch to the right and mark that stitch.
Round 14 (Color 2): Tip: This round will form the corners to transition from a circle to a square.
Join yarn in marked stitch, ch1, starting in same st, *sc 1, hdc 1, dc 1, ch2, dc 1, hdc 1, sc 1, [FPtr around FPtr to the right three rows below, sc 1, FPtr around FPtr to the left three rows below, sc 6], repeat between [ ] once; FPtr around FPtr to the right three rows below, sc 1, FPtr around FPtr to the left three rows below*; repeat between * to end, join. Fasten off. (27 sts on each side + ch2 in each corner)
Round 15: Join in any corner, ch2, *{3dc, ch2, 3dc} in corner space, hdc 2, 2dc, [FPdc2tog around next two FPtr (skip sc between the two FPtr), sc 6] repeat between [ ] once, FPdc2tog around next two FPtr (skip sc between the two FPtr), 2dc, hdc 2*; repeat between * to end, join. Fasten off. (29 sts on each side + ch2 in each corner)
Round 16: Join in any corner, ch1, *[sc 1, ch2, sc 1} in corner, sc 5, hdc 1, dc 3, hdc 1, sc 4, hdc 1, sc 4, hdc 1, dc 3, hdc 1, sc 5*, repeat between * to end, join. Fasten off. (31 sts on each side + ch2 in each corner)
Round 17: Join in any corner, ch2, *5dc in corner, leave next st unworked, [skip next st, dc 1, working in front of stitch just made, dc in skipped st], repeat between [ ] to corner*; repeat between * to end, join. Fasten off. (15 crossed sts on each side + 5dc in each corner)
Round 18: Join in center dc of corner, ch1, *3sc in corner, working in back loop only, sc in each st to next corner*, repeat between * to end, join. Fasten off. (34 sts on each side + 3sc in each corner)
Round 19: Join in center sc of corner, ch1, *{sc, hdc, sc} in corner, working in back loop only, sc in each st to next corner*, repeat between * to end, join. Fasten off. (36 sts on each side + 3sc in each corner)
Don’t Forget To Pin It Too!

More Crochet Squares For YOU!


************************************************************************************************
I can't wait to see your finished projects,
so feel free to share them on my Facebook page!
Follow me on…


Sign up for my newsletter and get free patterns, giveaways and
other fun stuff delivered directly to your mailbox!

****************************************************************
I’m always happy to help you with questions regarding my patterns. Send me a message and I'll get back to you as soon as possible. Please feel free to sell finished items from my patterns. Pattern credit is not required, but is always appreciated.
Copyright © 2023 Pattern Paradise. All rights reserved. No part of this publication may be reproduced, distributed, or transmitted in any form or by any means, including photocopying, recording, or other electronic or mechanical methods, without the prior written permission of the publisher.


I’ve tried this twice, once carrying the thread awkwardly up the back and then again with properly tapestry crochet, and I still get striping. When you write ‘sc in next # stitches’ do you actually mean ‘sc around next # stitches’ to conceal the contrasting color, and if so, could you say so in the pattern?
Hi there, no, I mean to sc in the stitch as normal. I’m not sure where you are getting striping. If you’d like, please send me a photo of your work in progress and I’ll try to help you.
Hi,
Do you have a diagram for this pattern?
Thanks
Not at this time, but I hope to add one in future.
Hi,
Do you have a diagram for this pattern?
Thanks. ^_^
Not at the moment, hoping to add one in the future.
how do you print the free pattern out? I’ve looked all over the page.
The pattern is free on my website. If you’d like an ad-free, printable PDF, it is available for sale in my Ravelry, Etsy and Love Crafts shops.
Love this design and pattern!! I have a bunch of squares I’ve made that I want to put together as a blanket. Do you have any suggestions for joining the squares? I wasn’t sure if you had done this and found a good technique. If not, I appreciate your time! Thank you!
I have not done it yet, but there are many different ways to join them that I think would be lovely. Moogly has a post on several different ways you might like: https://www.mooglyblog.com/join-crochet-squares/
Thank you for the lovely free pattern. I am stuck on Round 6, where do i put the 2 sc? I get the FP stitch fine, but do i go back to the base colour row, in base colour to do the sc, or what?
I’m not sure which 2sc you are referring to in Round 6. You will join above the cluster, make your first front post stitch, then sc in the next 3 sts. If you need further assistance, please email me.
Hello
Beautiful pattern. Just a quick question_ Does the purchased pdf have more images / pictures? TIA
No it does not. It is a clean, PDF pattern.
I’m only getting started and am already confused :-O Row 5 *hdc 2, 2 hdc in next st*, What do you mean hdc 2? Can’t mean 2x hdc as that is right after the , 2hdc.
hdc = half double crochet
You will find all of the abbreviations in the section at the top of the pattern.
I LOVE this square and would love to make a bedspread for my daughter for her 21st but i cannot get past row 11! It says i should end with 84 sts but i get 96. Starting row 11 i have 12 bobbles and 60sc so i really dont know where i am going wrong. Any help appreciated thankyou, also another request for a video tutorial when you have time please 🙂
The video is on the “to do” list! As for the stitch count, I’m not sure where you might be going off track. I’d suggest taking the instructions one step at a time being careful to follow the skips and stitches exactly. What I find is sometimes our brains are used to a certain thing and they tell us to do it that way, even though that’s not exactly how it was written!
I have redone it 5 times, started with a fresh mind after a good nights sleep but still i cant get it, im wondering if where it says to skip only 1 stitch, not 2 might be where im going wrong but i have tried and tried again being very careful to no avail 🙁 Will leave it for a few days and try again, thanks so much for your reply
Yes, sometimes putting it down for a bit can be helpful. I’m sorry I can’t be more help, I wish I could be there with you so I could see where it is going off track 🙁
Love the pattern would like to see a video of it. It would help a great deal. Thanks
I love this square pattern. It looks so striking with the light color on top but most of the stitches are very confusing to me. I’m a self taught crocheter for about a year and would love to learn these stitches and a video would be a huge help. I’m struggling to understand patterns without a visual presentation since I’m a visual learner. It would be very appreciated if you could make a video of this pattern.
Thank you for your note. It is on my list to add a video of this square, but I just don’t have a date yet. Stay tuned….
Hi,
Beautiful design. Would you happen to have a video tutorial? I’m only on the third round and it does not look right, not sure what chain counts as the 2nd row. I’m better visually, like with a follow along lol.
So sorry, I don’t have a video at this time – perhaps I will add one in future 🙂
If this is a free pattern then why can I not get it to download so I can print it off i have been trying for 3weeks now? Can you spend it to me in my email in PDF I believe so I can get it. Thanks
Thanks for writing. The pattern is free on my website. If you would like an ad-free PDF, it is available for download for a small fee in my Ravelry shop (the link is in the post).
I had purchased pattern but when I tried to download, it wouldn’t. I checked my downloads and it shows file is broken. Not sure what to do.
Please contact me at [email protected]
Lovely pattern! I’m currently on round 15 and I feel like I must be making a huge mistake somewhere and I’m not seeing it. My stitch count is correct coming out of round 14, but the way 15 is written just doesn’t work for me. It works up until this part:
“[FPdc2tog around next two FPtr (skip sc between the two FPtr), sc 6] repeat between [ ] once”
When I begin the repeat in [ ], there’s nothing to do the FPdc2tog around where I am at that point.
Can you help me? I’d love to finish this square!
If you start the round in the corner, the stitches work out. Basically you are working the FPtr stitches from the previous round together to get the point. Hope that helps.
I’m up to round 17 on first method. I’m confused regarding dc 1, working in front of stitch just made, dc in skipped st. Are you referring to the 5th dc in the corner? Like working front post of the DC?
This refers to working a crossed stitch, like an X stitch. I have a tutorial you may find helpful.
https://pattern-paradise.com/2015/01/14/x-stitch-challenge-basic-tutorial/
I’m going to attempt this one. I’m a self taught knitter and crocheter. The pattern is beautiful. I’m going to try the method one. I think it’s looks cleaner and more professional. thanks
Also, thanks for the tutorials. They help me pick up the craft easier.
That’s great! I hope you enjoy it 🙂
Paradise, So far I have done the pattern up to Round 14. Question: Should there we another round of 108 sc. Just wondering as I look at picture and then pattern.. I’m a little confused.
It looks like another round was added via pic. I maybe wrong.
It’s a very pretty pattern. Thanks
No the rounds are as written in the pattern 🙂