
Enjoy this month’s X Stitch Challenge crochet pattern
Julia’s Hat

This month, the X Stitch Challenge crochet pattern is the Julia Hat.
~ Don’t lose it, add It To Your Ravelry Queue Or Favorites ~
~ And don’t forget to Pin It Too ~
* Purchase an ad-free PDF of this pattern on Craftsy or Ravelry *
Find all my FREE crochet patterns HERE
I designed this crochet pattern with my version of a modified X stitch. I love how the stitches line up diagonally and create a neat, highly textured look. So many hats are worked with plain half double or double crochet at the crown and the pattern starts several rows down from the top, but I wanted this hat to be X stitches from crown to band! It’s a little tricky to get this done, but if you take your time and take a look at the pictures, you will surely have success.

I originally designed this hat for a friend’s daughter. The young lady is quite picky when it comes to her fashion accessories and I was delighted that she loved this hat. I added a double layered flower for her hat, but of course, you can decorate any way you like or not at all!

I think it looks sophisticated with a decorative button or two.
I used Caron Simply Soft yarn for the first two hats. You can find a nice selection at Annie’s.

Use coordinating colors to make a striped hat and use up those leftovers balls. Add a cute animal button for a playful flair.

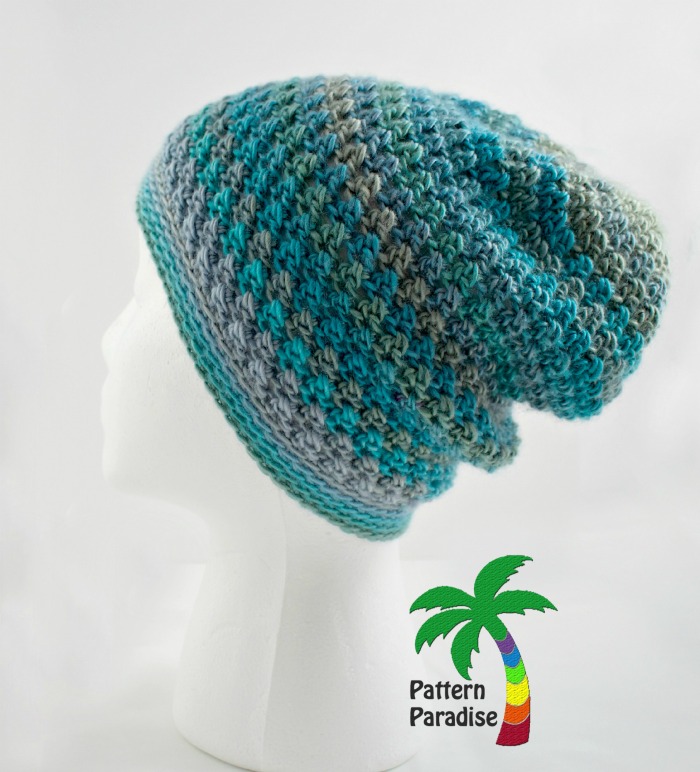
The pattern is easily modified for a slouchy look too. Just add a few rows to the length to achieve the “slouch”. I love the variegated shading of the Red Heart Unforgettable yarn I used for this slouchy.
>>>>>>>>>>>>>>>>>>>>>>>>>>
Even though I designed this hat for a young lady, you can easily adapt it for a boy too (they like texture too right?) and with sizing from Newborn to Adult, you can have fun experimenting. I hope you enjoy making this quick project and will share your finished pictures on my Facebook.
Julia’s Hat Instructions
Materials:
- Made with worsted weight yarn such as Red Heart Soft ~100-300 yards depending on size
- You may want contrasting colors for flower trim
- Optional – buttons to decorate band
Gauge: Hook US H/5.00mm; 8 XSt x 9 Rows = 4”
Size: Newborn to Adult
Abbreviations:
beg- beginning
ch – chain
dc – double crochet
sc – single crochet
sl st – slip stitch
st(s) – stitch(es)
tr – treble crochet
Special Stitch:
- XSt – X Stitch – skip next st, dc in next st, working around stitch just made, work dc in skipped st (click here for tutorial)
- Overlapped XSt – Overlapped X Stitch – dc in next st, working around stitch just made, work dc in same stitch as previous XSt. (you will have two halves of each stitch in the same hole)
-

- Fig 1
-

- Fig 2
-

- Fig 3
- Weave ends as you work
- Chain 1 or Chain 2 at beginning of round does not count as stitch
- Chain 3 at beginning of round COUNTS as a stitch
- Numbers in ( ) at end of the round are the number of stitches in that round for your guidance.
- Work instructions in [ ] as designated
- When a number precedes a stitch you will complete that number of stitches in the next stitch. Example: 3hdc means you will make 3 hdc in the next stitch.
- Start each round in the same stitch as the join
- Join each round with a slip stitch in both loops of the beginning stitch.
**********
Newborn – 3 Months
Fits 12–14″ Circumference • Crown to Band 5.5″
Join at end of each round with sl st to first st.
Round 1: Start with a Magic Circle, ch1, 8 sc in center, join. Pull starting strand to close opening.
Round 2: Ch3, dc in next st to right (beg XSt made), working in the usual direction, [dc in next st, working around dc just made, dc in previous st], repeat to end, join. See Fig 1 (8 XSt)
Round 3: Repeat Round 2. (16 XSt)
Round 4: Ch3, work dc in next st to right (beg XSt made), working in usual direction, XSt 2 times, Overlapped XSt in next 2 sts; [XSt 3 times, Overlapped XSt in next 2 sts], repeat between [ ] to end, join. Diameter approx. 3 ¾” See Fig 2 & 3 (20 XSt)
Rounds 5 to 10: Ch3, dc in next st to right, XSt to end, join. (20 XSt)
Note: For a slouchy hat repeat for 2”.
Round 11: Ch1, sc in each st to end, join. (40 sc)
Rounds 12 to 13: Ch1, working in back loop only, sc in each st around to end. DO NOT JOIN. Continue working in a spiral until all repeats are completed, sl st in next st. Fasten off. Note: it may be helpful to use a stitch marker to keep track of each round.
**********
3 – 6 Months
Fits 15–17″ Circumference • Crown to Band 6.5″
Join at end of each round with sl st to first st.
Round 1: Start with a Magic Circle, ch1, 8 sc in center, join. Pull starting strand to close opening.
Round 2: Ch3, dc in next st to right (beg XSt made), working in the usual direction, [dc in next st, working around dc just made, dc in previous st], repeat to end, join. See Fig 1 (8 XSt)
Round 3: Repeat Round 2. (16 XSt)
Round 4: Ch3, work dc in next st to right (beg XSt made), working in usual direction, XSt 2 times, Overlapped XSt in next 2 sts; [XSt 3 times, Overlapped XSt in next 2 sts], repeat between [ ] to end, join. See Fig 2 & 3 (20 XSt)
Round 5: Ch3, work dc in next st to right (beg XSt made), working in usual direction, XSt 3 times, Overlapped XSt in next 2 sts; [XSt 4 times, Overlapped XSt in next 2 sts], repeat between [ ] to end, join. (24 XSt)
Rounds 6 to 12: Ch3, dc in next st to right, XSt to end, join. (24 XSt)
Note: For a slouchy hat repeat for 2”.
Round 13: Ch1, sc in each st to end, join (48 sc)
Rounds 14 to 16: Ch1, working in back loop only, sc in each st around to end. DO NOT JOIN. Continue working in a spiral until all repeats are completed, sl st in next st. Fasten off. Note: it may be helpful to use a stitch marker to keep track of each round.
**********
6 – 18 Months
Fits 16–18″ Circumference • Crown to Band 6.5″
Join at end of each round with sl st to first st.
Round 1: Start with a Magic Circle, ch1, 8 sc in center, join. Pull starting strand to close opening.
Round 2: Ch3, dc in next st to right (beg XSt made), working in the usual direction, [dc in next st, working around dc just made, dc in previous st], repeat to end, join. See Fig 1 (8 XSt)
Round 3: Repeat Round 2. (16 XSt)
Round 4: Ch3, work dc in next st to right (beg XSt made), working in usual direction, XSt 2 times, Overlapped XSt in next 2 sts; [XSt 3 times, Overlapped XSt in next 2 sts], repeat between [ ] to end, join. See Fig 2 & 3 (20 XSt)
Round 5: Ch3, work dc in next st to right (beg XSt made), working in usual direction, XSt 3 times, Overlapped XSt in next 2 sts; [XSt 4 times, Overlapped XSt in next 2 sts], repeat between [ ] to end, join. (24 XSt)
Round 6: Ch3, work dc in next st to right (beg XSt made), working in usual direction, XSt 4 times, Overlapped XSt in next 2 sts; [XSt 5 times, Overlapped XSt in next 2 sts], repeat between [ ] to end, join. Diameter approx. 5 ¼” (28 XSt)
Rounds 7 to 13: Ch3, dc in next st to right, XSt to end, join.. (28 XSt)
Note: For a slouchy hat repeat for 2”.
Round 14: Ch1, sc in each st to end, join (56 sc)
Rounds 15 to 17: Ch1, working in back loop only, sc in each st around to end. DO NOT JOIN. Continue working in a spiral until all repeats are completed, sl st in next st. Fasten off. Note: it may be helpful to use a stitch marker to keep track of each round.
**********
Child
Fits 18 –20″ Circumference • Crown to Band 7.5″
Join at end of each round with sl st to first st.
Round 1: Start with a Magic Circle, ch1, 8 sc in center, join. Pull starting strand to close opening.
Round 2: Ch3, dc in next st to right (beg XSt made), working in the usual direction, [dc in next st, working around dc just made, dc in previous st], repeat to end, join. See Fig 1 (8 XSt)
Round 3: Repeat Round 2. (16 XSt)
Round 4: Ch3, work dc in next st to right (beg XSt made), working in usual direction, XSt 2 times, Overlapped XSt in next 2 sts; [XSt 3 times, Overlapped XSt in next 2 sts], repeat between [ ] to end, join. See Fig 2 & 3 (20 XSt)
Round 5: Ch3, work dc in next st to right (beg XSt made), working in usual direction, XSt 3 times, Overlapped XSt in next 2 sts; [XSt 4 times, Overlapped XSt in next 2 sts], repeat between [ ] to end, join. (24 XSt)
Round 6: Ch3, work dc in next st to right (beg XSt made), working in usual direction, XSt 4 times, Overlapped XSt in next 2 sts; [XSt 5 times, Overlapped XSt in next 2 sts], repeat between [ ] to end, join. (28 XSt)
Round 7: Ch3, work dc in next st to right (beg XSt made), working in usual direction, XSt 5 times, Overlapped XSt in next 2 sts; [XSt 6 times, Overlapped XSt in next 2 sts], repeat between [ ] to end, join. Diameter approx. 6” (32 XSt)
Rounds 8 to 15: Ch3, dc in next st to right, XSt to end, join. (32 XSt)
Note: For a slouchy hat repeat for 3”.
Round 16: Ch1, sc in each st to end, join (64 sc)
Rounds 17 to 20: Ch1, working in back loop only, sc in each st around to end. DO NOT JOIN. Continue working in a spiral until all repeats are completed, sl st in next st. Fasten off. Note: it may be helpful to use a stitch marker to keep track of each round.
**********
Adult
Fits 20 –24″ Circumference • Crown to Band 8.0″
Join at end of each round with sl st to first st.
Round 1: Start with a Magic Circle, ch1, 8 sc in center, join. Pull starting strand to close opening.
Round 2: Ch3, dc in next st to right (beg XSt made), working in the usual direction, [dc in next st, working around dc just made, dc in previous st], repeat to end, join. See Fig 1 (8 XSt)
Round 3: Repeat Round 2. (16 XSt)
Round 4: Ch3, work dc in next st to right (beg XSt made), working in usual direction, XSt 2 times, Overlapped XSt in next 2 sts; [XSt 3 times, Overlapped XSt in next 2 sts], repeat between [ ] to end, join. See Fig 2 & 3 (20 XSt)
Round 5: Ch3, work dc in next st to right (beg XSt made), working in usual direction, XSt 3 times, Overlapped XSt in next 2 sts; [XSt 4 times, Overlapped XSt in next 2 sts], repeat between [ ] to end, join. (24 XSt)
Round 6: Ch3, work dc in next st to right (beg XSt made), working in usual direction, XSt 4 times, Overlapped XSt in next 2 sts; [XSt 5 times, Overlapped XSt in next 2 sts], repeat between [ ] to end, join. (28 XSt)
Round 7: Ch3, work dc in next st to right (beg XSt made), working in usual direction, XSt 5 times, Overlapped XSt in next 2 sts; [XSt 6 times, Overlapped XSt in next 2 sts], repeat between [ ] to end, join. (32 XSt)
Round 8: Ch3, work dc in next st to right (beg XSt made), working in usual direction, XSt 6 times, Overlapped XSt in next 2 sts; [XSt 7 times, Overlapped XSt in next 2 sts], repeat between [ ] to end, join. Diameter approx. 6 ¾” (36 XSt)
Rounds 9 to 16: Ch3, dc in next st to right, XSt to end, join. (36 XSt)
Note: For a slouchy hat repeat for 3”.
Round 17: Ch1, sc in each st to end, join. (72 sc)
Rounds 18 to 21: Ch1, working in back loop only, sc in each st around to end. DO NOT JOIN. Continue working in a spiral until all repeats are completed, sl st in next st. Fasten off. Note: it may be helpful to use a stitch marker to keep track of each round.
**********
Flower 1 (top layer):
Round 1: Start with a Magic Circle, ch1, 8 sc in center, join with sl st to beg sc. Pull starting strand to close opening.
Round 2: Ch1, 2sc in each st. Join with sl st to beg sc. (16)
Round 3: [(ch3, 3tr, ch3, sl st) in same st, sl st in next 2 sts], repeat between [ ] to end. Join with sl st to bottom of beg ch3. Fasten off. (8 petals)
Flower 2 (back layer):
Round 1: With contrasting color, repeat Round 1 of Flower 1.
Round 2: Ch1, 2hdc in each st. Join with sl st to beg hdc. (16)
Round 3: Ch1, 2hdc in same st, hdc in next st, [2hdc in next st, hdc in next st] 11 times. Join with sl st to beg hdc. (24)
Round 4: Repeat Round 3 of Flower 1. (12 petals)
Layer smaller flower on top of larger flower, using a decorative button for center, sew through all 3 layers. Sew in place on the hat.

************************************************************************************************
I can't wait to see your finished projects,
so feel free to share them on my Facebook page!
Follow me on…


Sign up for my newsletter and get free patterns, giveaways and
other fun stuff delivered directly to your mailbox!

****************************************************************
I’m always happy to help you with questions regarding my patterns. Send me a message and I'll get back to you as soon as possible. Please feel free to sell finished items from my patterns. Pattern credit is not required, but is always appreciated.
Copyright © 2023 Pattern Paradise. All rights reserved. No part of this publication may be reproduced, distributed, or transmitted in any form or by any means, including photocopying, recording, or other electronic or mechanical methods, without the prior written permission of the publisher.


im confused by the stitch count if the x stitches are worked over 2 stitches how does row 2 end with 8 xstitches ?
Hi Lindy, take a look at the picture in Figure 1 in the pattern. The stitches are overlapped in the same place as the previous stitch. So for example, the first part of the first X St is worked in st #2 and then the second part in st #1; then the first part of second X St is worked in st #3 and the second part in st #2 – you can see that st #2 actually has two sts in it as the X Sts form. I hope this helps.
Yes that helps a lot thank you so much
Great!
I love this beanie!!! But I cannot get the stitch right. Is there a video or something somewhere that I would be able to watch?
I’m sorry, I don’t have a video for it.
Beautiful pattern! I can’t wait to try it!
Thanks!
Do you adjust the flower size by changing hooks for different size hats? Thank you for this pattern. I don’t like making hats because the seam shows and I don’t take the time to try and figure it out. I love your pattern. Can’t follow the seam at all. Made 0-3 months and now going to attempt adult
Thank you! Yes, you can vary the hook/yarn for different size flowers.
Please feel free to post a picture of you finished hat on my Facebook page 🙂
Thank you for great patterns ,love them all
Thank you!
Nice hat.
I can´t get the print friendly button to work
You can’t print the pattern?
LOVE this pattern – I’m like you – I don’t like it when the stitch starts half way down the hat! Going to give this a try with HL’s Soft Secret – thinking the stitches will pop with the yarn’s sheen.
Thank you so much for sharing!
Sounds wonderful, don’t forget to share finished pics!
I love your work. Your designs are Unique and very Lovely. What i love about your crochet patterns is that they differ from many other Crochet designers. You use yarn that is pretty, easy to work with, but mostly they are affordable. I like that you show a pattern worked in different yarns. I came across one of your patterns on another page and i’m glad i did. I shall tell others of your work. You are very talented and may you continue to prosper. Thank you for sharing.
Well thank you very much!
I love the look of this “X Stitch”. Gives it a nice, subtle texture. Pinned, and sharing on Facebook.
Most of all – grateful for the all sizes!
Would love if you shared this at our Yarn Fanatic Linky Party – http://eyeloveknots.blogspot.com/2015/03/yarn-fanatic-linky-party-28.html.
Thank you!
Thank you!
Thanks!